*NOTE: The original post came with drum samples, but the download link is no longer available. Just follow along as if you really were doing it.
Here I hope is an easy-to-follow tutorial that will teach you the basics on how to help you find the rhythm in the song you are remixing using syncopation. This tutorial was written in mind that a basic beginner remixer can understand it.
This tutorial will help us find the syncopated beats , or stressed beats, in our song using kick drums. Kick drums, or bass drums, have a deep sound and are most commonly used to stress the rhythm in a song.
The method I'm going to explain to you works for me all the time. Once your ear is trained better, you'll probably be able to omit some of these steps. But for now, just follow these simple steps.
Your list of things:
The instrumental of the original song
A music program that can use an equalizer
An equalizer (a tool, usually listed under effects, provided with good music programs)
For this tutorial, I'm going to give you all the things you need in a handy zip! It includes:
2 instrumentals
An example equalized instrumental
One-shot kick drum
One-shot snare
Questions you probably are asking yourself right now
What is syncopation?
Quote:
|
Originally Posted by Wikipedia
In music, syncopation is the stressing of a normally unstressed beat in a bar or the failure to sound a tone on an accented beat.
Syncopation is used on occasion in many musical styles, including classical music, but it is fundamental in such styles as ragtime and jazz. In the form of a back beat, syncopation is used in virtually all contemporary popular music.
|
Why will using syncopation help my mixes?
It will help bring your piece together to create the original rhythm that was in the song. It doesn't necessarily mean having the same bass, drums, etc, but it will DEFINITELY make your mix flow a lot better by stressing the same beats that were stressed in the original.
Many beginners do not even think about this kind of this. They just place down their favorite drum track and let it go. However, the drum track can kill the rhythm of the song because it's emphasized beats are different than the song you are trying to remix. You can easily try to manipulate your favorite drums when you recognize what these stressed beats, the syncopation, are. And yes, good vocals, whether you hear it or not just listening to an a capella, do carry these stressed beats, and when you put down a drum track with different stressed beats, you will hear a difference, and it's not a good one!
What's an equalizer?
An equalizer is a simple tool, usually provided in a music program through the effects menu, that changes the volume of frequences. Frequencies are the rate at which a sound vibrates. Hertz, or Hz, is how frequencies are measured. When you use an equalizer, you will effect all instruments and sounds in your music at that particular frequency.
So, let's begin!! For this tutorial, I will be using ACID music, since I know a lot of you probably use it. Screenshots are provided, because it's always better to have visuals.
STEP ONE
We are going to set up our project file in this step.
A) Unzip the tutorial package you should have downloaded

Make sure you keep all contents in the same place, and remember where you unzipped them!
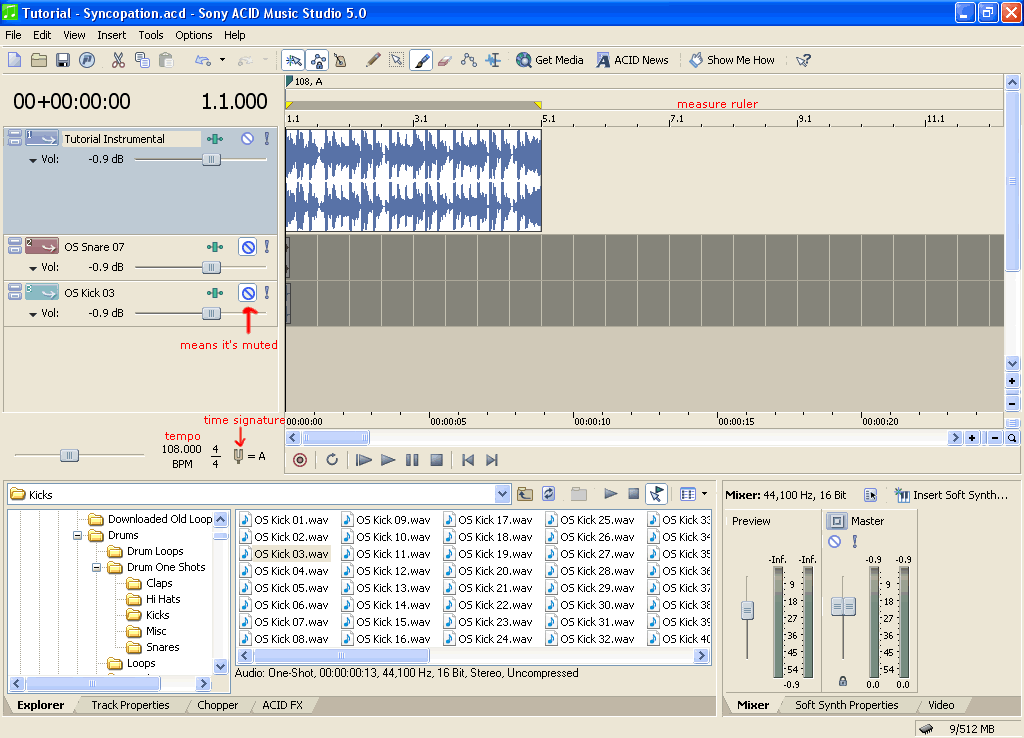
B) Open your music program, and import "Tutorial - Syncopation" and both one-shot drums into the same project file. Do not import the "Tutorial - Syncopation 2" or "Tutorial - Syncopation 2_eq".
C) Mute the one-shot drums so we can focus just on the instrumental for now
D) Set your project to the song's tempo. The instrumental included already starts on the first beat of a measure. Set the project for this particular file to 108bmp, and make sure you are in 4/4 time (check the time signature).
STEP TWO
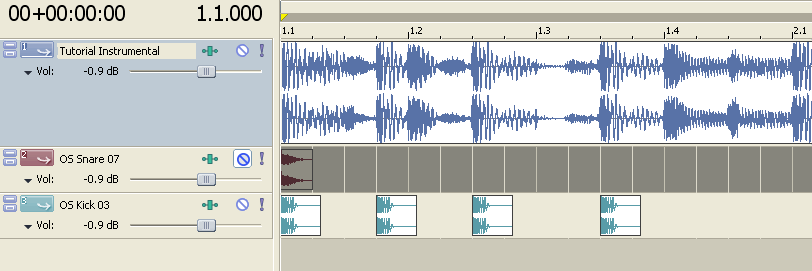
Listen to the track a couple of times. Try to notice where the kick drums and snares are located in your instrumental. In the tutorial instrumental, every measure is the same, drum wise, so every measure has the same syncopation. In the picture, I've zoomed in on just one measure to show you the placement of the kick drums and snare drums.
With Markings
 Without Markings

Since this song does not have very much going on, it's easier to pinpoint the placement of the kick drums using the peaks in the waves of the track. The waves are the blue stuff you see in the track. The bigger, taller waves from top to bottom mean the music is louder at that particular point, which usually means thats where our stressed beats are!
STEP THREE
It's time to mark down those syncopated beats using our one shot kick drum. The syncopated beats in this song are only marked where the kick drums are.
We are going to replicate the placement of the kick drums of the instrumental in this step.
A) Unmute the one-shot kick drum, called OS Kick 03.
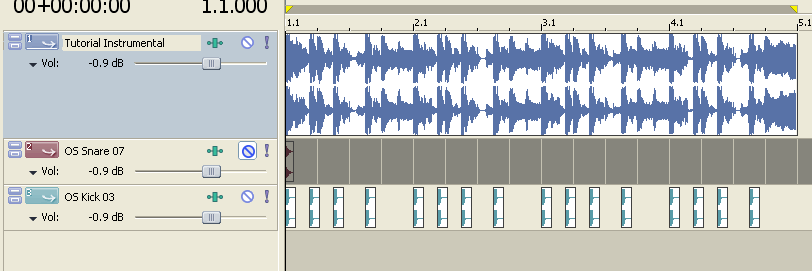
B) In the same spots I've marked above, where those loud beats are, is where you place your kick drums using the one shot, for just the first measure right now. The exception are the ones marked at 1.2 and 1.4 on the measure ruler, and the box I've marked as orange. The drums at 1.2 and 1.4 are the snare drums.
 STEP FOUR
Now that we have the kick drums down for the first measure, we can copy it for the next three. Like I said above, the reason we can do this is because this particular song has the same stressed beats every measure.
~+~+~+~+~+~+~+~+~+~+~+~+~+~+~+~+~+~+~+~+~+~
Okay Kiz, so why did we just do all that?
Kick drums in most music are placed at these stressed beats, which remember is syncopation. And syncopation helps us create the rhythm of the song.
Why'd you include a one-shot snare drum when we didn't even use it?
Listen to the snare drum, then the kick drum. Do you hear the difference? The kick drum has a lower, deep sound to it. The snare has a higher pitch and isn't as smooth sounding as the kick drum. Kick drum frequencies are usually very low - I find them to be below 200Hz - while snare drums are higher, between about 500Hz and 1000Hz.
Most snares in pop music are placed at the 2nd and 4th beat in a measure. This varies from song to song, but generally, they are placed in these two spots.
~+~+~+~+~+~+~+~+~+~+~+~+~+~+~+~+~+~+~+~+~+~
So if you guys got all that down, it's time to use the equalizer to help us find these kick drums!
In busier music, music that has a LOT going on, it can get difficult to hear where these kick drums are, especially if there is a lot of instruments in lower octaves, playing lower pitches. Because I chose a simpler song to pinpoint the syncopated beats, we didn't need to use it. But now, I will teach you how to utilize it just in case you want to get those beats right, but can't seem to pick out the right
Let's continue!
STEP ONE
Let's set up our project again
A) Open a new project file
B) Import Tutorial - Syncopation 2, and the OS Kick 03
C) Mute the kick drum.
D) This new track has a faster tempo than our old one. This new instrumental is at 161bmp, but it lines up a bit better at 160.84 (we don't ask why for this

) so set it to 160.84
STEP TWO
Whatever program you are using, find your effects menu, and look for equalizer.
Some example names include, Equalizer, FxEqualizer, FxEq, and Parametric Eq.
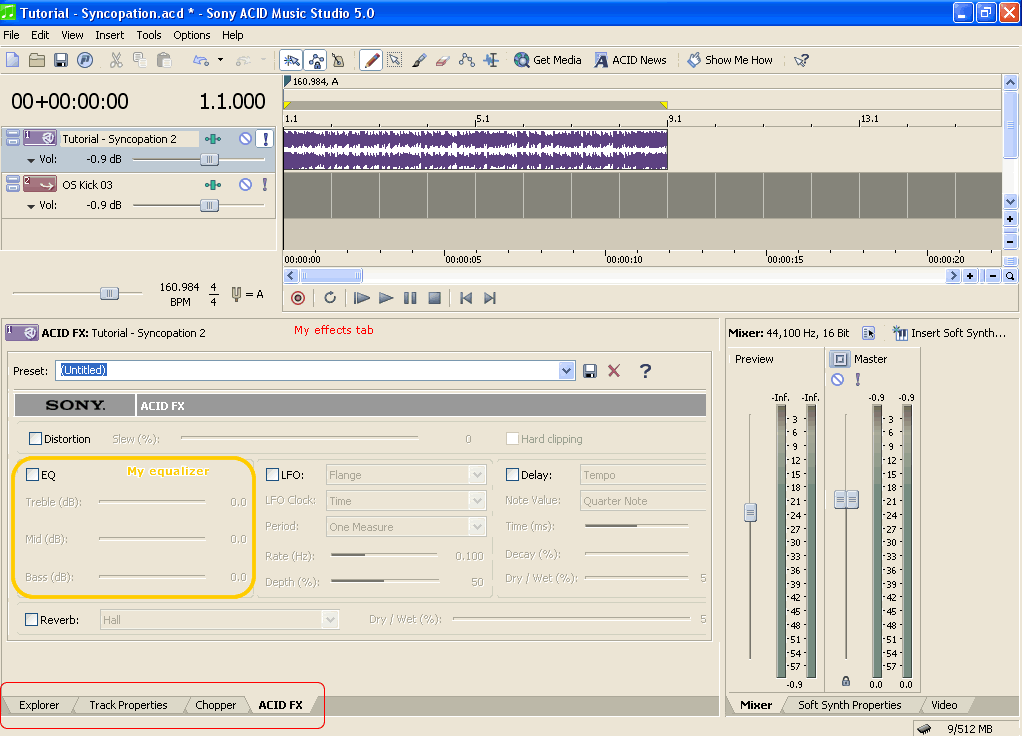
In ACID music, the program I'm using in this tutorial, the effects are in one of the bottom tabs in my window. It's in the tab called ACID FX.
Apply your equalizer to the new instrumental track.
STEP THREE
This next step will just show us some different equalizers.
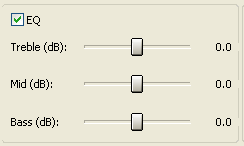
The one in ACID music is very simple, only having Bass, Mid, and Treble frequences. The dB measures the volume of each frequency.

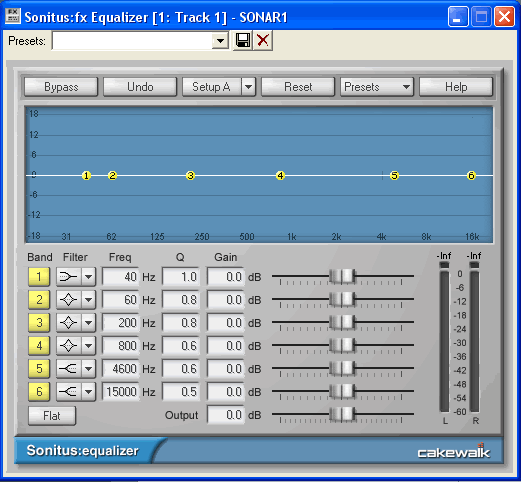
This equalizer is the one I normally use. It's a lot more complex than the ACID eq. This one is the Sonitus Equalizer.
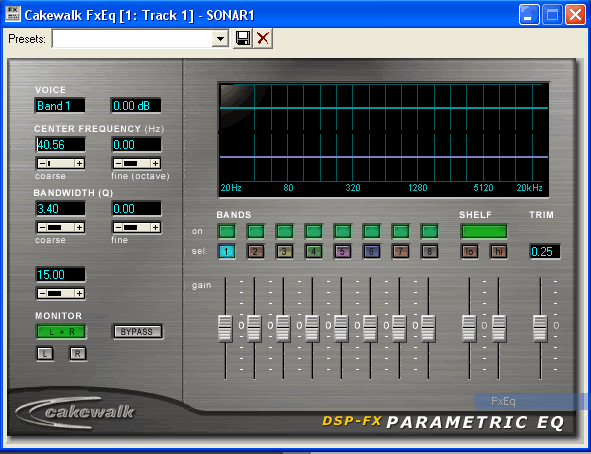
This is another one I use, even MORE complex than the Sonitus!
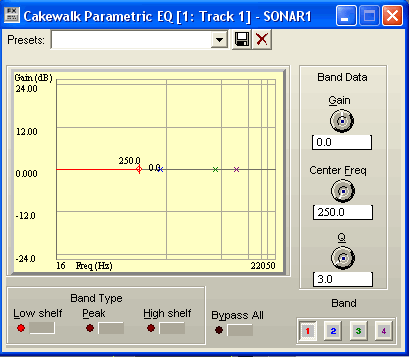
This is a simpler one, called Parametric Eq in another one of my programs.
I can't tell you how to use your equalizer, because I don't have it. But if you have ACID music, you are in luck
 STEP FOUR
In ACID Music, in order to enable to Equalizer on the instrumental track, make sure it's selected, then click on the white box so it has a check mark.
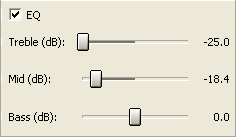
The volumes of the Bass, Mid, and Treble are all at 0.0dB, meaning they are at the original volume.
 STEP FIVE
This track is very busy, and has a very loud bass which might throw us off where our kick drums are. So let's use the equalizer. Remember how I said kick drums have a lower frequency? That means when using an equalizer, you will not lower the bass frequencies. You will lower the Mid and Treble frequencies instead.
A) Lower the Treble all the way down to -25.0dB.
b) Lower the Mid to about -18.
NOTE: You can listen to Tutorial - Syncopation 2_eq for an example of what you want the equalized track to sound like.
 STEP SIX
Listen back to the track. Hear the difference? The kick drums are more audible now.
Export our new track, with equalizer on it, and name it something you can easily distinguish from the original.
STEP SEVEN
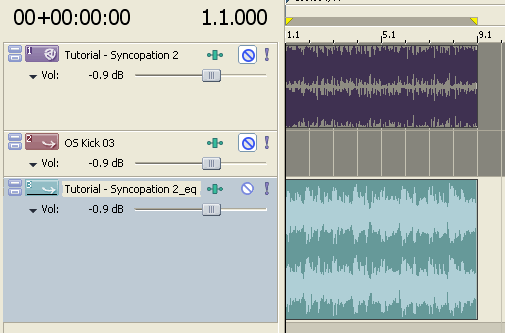
Import the new, equalized track back into our project, and mute the original.
 STEP EIGHT
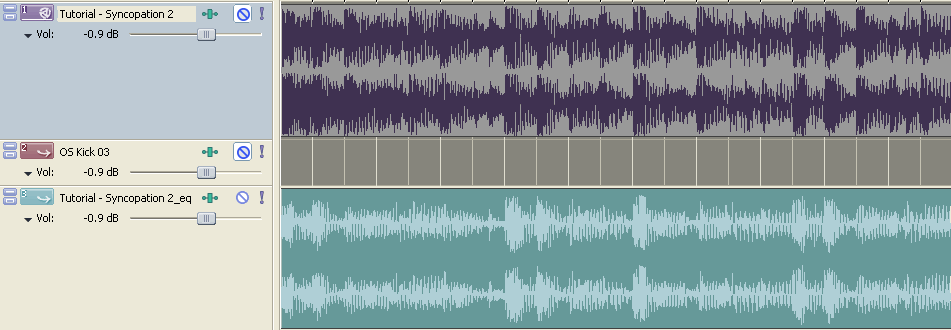
Zoom in, and look at the difference in peaks in the new track. We'll now have an easier time pinpointing the kick drums here.
In this song, every 4 measures repeats the drums.
 STEP NINE
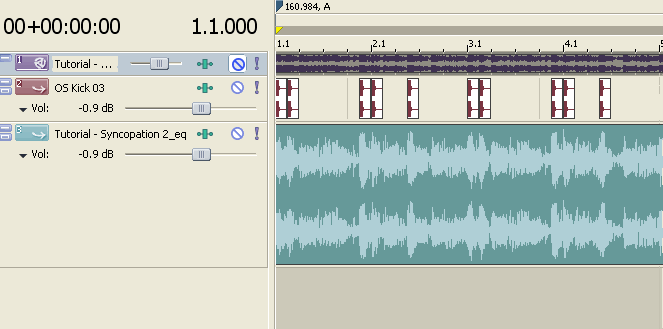
Starting with measure one, zoom in, and and listen to just the first measure. The thicker, taller peaks will be the stressed beats we are looking for.
Unmute the kick drum, and place them in the same spots.
 STEP TEN
Copy the drums of the first four measures into the last four.
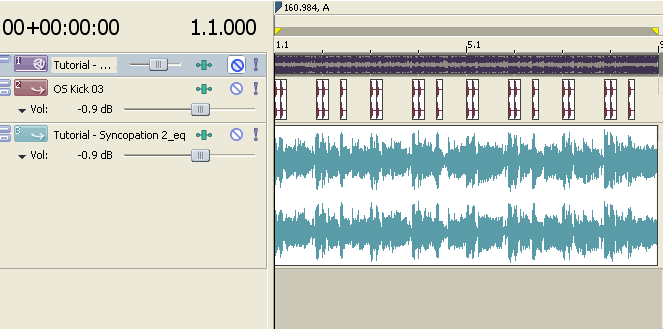
And we're done!!
~+~+~+~+~+~+~+~+~+~+~+~+~+~+~+~+~+~+~+~+~+~
A FINAL NOTE
In our examples, the kick drums marked the syncopated beats. However, sometimes that doesn't mean you have to have kick drums there. A lot of pop music can be remixed to have kick drums on each quarter beat in a measure. It simply means you should try to put stressed notes in those spots in your music. You can stress a note by making it a bit louder than the others.
Remember, an equalizer isn't always necessary, as we saw in the first part, but it really can help in identifying the stressed beats.
And there is always the exception to everything: just because there are kick drums placed in a certain spot does NOT mean there aren't any more syncopated beats somewhere else. It just means those are places of syncopated beats.
~+~+~+~+~+~+~+~+~+~+~+~+~+~+~+~+~+~+~+~+~+~
I hope this tutorial helped you in some way, shape, or form, and it wasn't too confusing for you! Tell me you loved it or hated it, tell me what I can change, and tell me if I'm completely wrong in what I just said. Remember, I'm NOT a music major, but I do have knowledge in music theory, and this is just a way I use to find the rhythm for my mixes. It works for every song I've chosen


